
Many RV ceilings are covered with headliner: polyurethane foam with a knit fabric face, glued to the ceiling surface. Others use rigid paneling sheets, such as a 4’x8′ white sheet about 3.4 mm thick. To replace a headliner, strip the old material completely, clean the surface, cut the new fabric oversized, and glue it with a foam-compatible adhesive in a well-ventilated space.

New to rigs in general? The camping in an RV guide covers the basics. Everything below is about the ceiling only.
What material is used for RV ceilings?
Common ceiling coverings include the following.
| Type | What it is | Typical use |
|---|---|---|
| Headliner (foam and knit fabric) | Polyurethane foam with fabric bonded to it, usually glued on with spray adhesive | Motorhome and trailer ceilings |
| Padded headliner | Headliner with an ivory overlay and 3/8″ foam padding | Thicker, softer look and more cushioning |
| Paneling sheets | Rigid sheets, for example white, 3.4 mm, smooth with no texture | Flat ceilings, patch jobs, rebuilds |
Behind any of them you’ll find bare metal, fiberglass or plywood, with wiring and seams running through. The 3/8″ foam in a padded headliner also takes the edge off sound and temperature transfer through the roof.
Don’t confuse the ceiling with wall siding. The aluminum versus fiberglass question is about the exterior skin and sidewalls: aluminum has visible ridges, fiberglass is smooth, lighter and resists dents better. It tells you nothing about what’s overhead.
Signs your ceiling needs replacing
Heat, cold and humidity break down the foam and the glue. The foam goes crumbly, the bond lets go, and the fabric drops away from the ceiling.
Brown or yellow stains mean water is getting in, either from a roof leak or from condensation. A musty or cooking smell that never fully clears points the same way, since cloth headliner soaks up both. Fine foam dust on the counters or crumbs on the bed means the foam layer is already disintegrating.
The stain is the one to take seriously. New fabric over a leak just hides it, so find the source and repair it before any glue comes out. Moisture also drives delamination in the walls, and sound roof seams and sealants limit that damage. They won’t stop headliner foam from aging on its own.
Where to buy RV ceiling paneling
Everything here is sold online. RV salvage and surplus suppliers carry ceiling paneling sheets, sometimes pickup only because of shipping cost. Specialty RV parts retailers sell vinyl paneling, batten strips and seam tape. Headliner fabric is sold by the foot from RV supply retailers, in widths of about 8’6″ or just over 4 feet and lengths from 5 to 30 feet.
Prices below are examples as of October 2026. Confirm them on the retailer’s page before ordering.
| Item | Example price |
|---|---|
| 4’x8′ white ceiling sheet, 3.4 mm | about $29.99, pickup only |
| Vinyl paneling | about $25.95 to $39.95 |
| Batten strips | about $9.95 |
| Seam tape, 1″ wide, 25 or 60 ft rolls | about $37.95 to $43.00 |
| Padded 50″ ivory headliner | about $109.95 |
| Padded headliner kit with adhesive | about $114.95 |
| 8’6″ beige headliner | about $129.95 |
| 8’6″ beige headliner kit | about $139.95 |
Kits include glue, with the number of cans set by the square footage of material ordered. Measure your own ceiling area first, then compare the kit’s coverage against it.
What you need before you start
- Headliner fabric or paneling sheets, plus a margin of extra material
- Foam-compatible spray adhesive (a flexible foam adhesive such as Bender’s Flexible Foam is the one the supplier recommends; read the manufacturer’s data sheet for its heat and moisture ratings)
- Scraper, putty knife or stiff brush for removing old foam
- Measuring tape and a marker
- Sharp scissors or a utility knife
- Cleaning supplies for the bare surface
- Gloves and a respirator suited to the adhesive (the can’s label names the right type)
- Fans or open windows and doors
How to replace an RV headliner, step by step
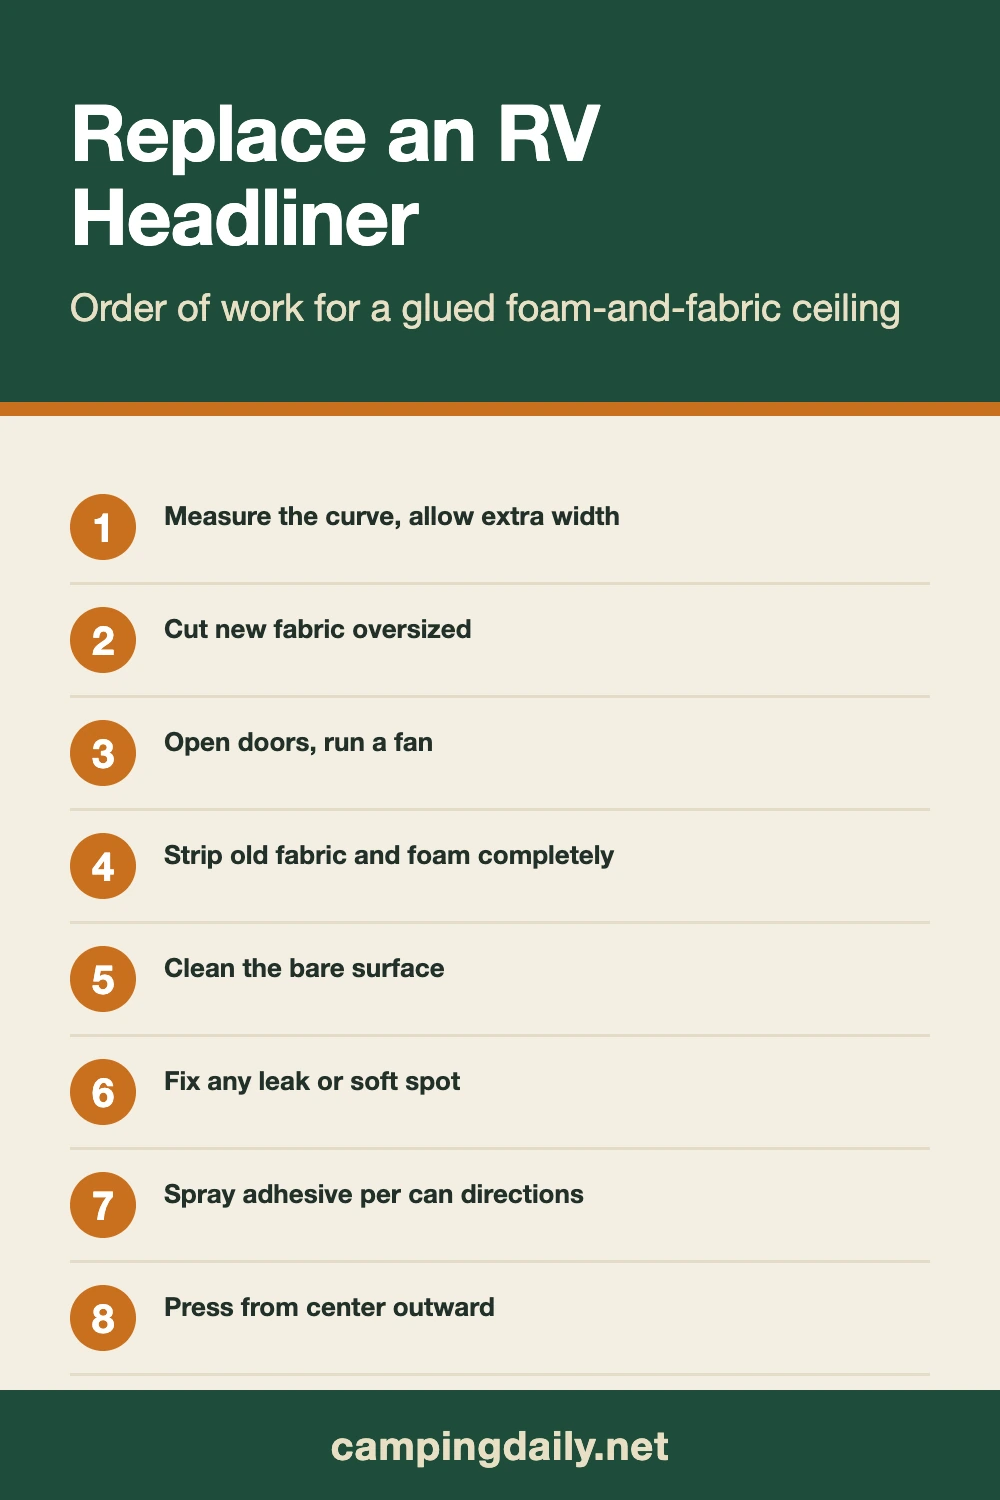
The job runs in this order: measure, strip, clean, glue, trim, with ventilation set up before any adhesive comes out. Bigger rigs take longer. The glue’s flash and cure times are printed on the can, so read them before you start spraying.
- Measure the interior. Ceilings are often curved, so measure along the curve, not straight across, and add width for the arc. Write the numbers down per section.
- Cut the fabric oversized. Leave a few extra inches on every side. A piece cut short can’t be stretched back.
- Set up ventilation. Open doors and windows and set a fan so air moves through. Check the adhesive label for flammability. Keep sparks and flames away, and turn off propane appliances and pilot lights while spraying and drying.
- Remove the old material completely. Pull the fabric, then scrape off the crumbled foam. Leftover foam can keep the new adhesive from bonding well, so remove all of it.
- Clean the surface. Take off dust, residue and grease.
- Check for moisture or damage. If the bare surface is stained or soft, stop and find the leak.
- Spray adhesive on the ceiling and the back of the fabric, following the can’s instructions for coverage and wait time.
- Press the fabric into place, starting at the center and working outward to push out air bubbles. On a curved ceiling, smooth it gradually instead of pulling hard in one direction.
- Trim the edges once the fabric is stuck down and you can see exactly where it ends.
Fitting around lights, vents and fans
Mark each opening from below. Turn off power to anything wired through the ceiling before you touch a fixture. Start with a small cut, then widen it until the fixture seats. A hole cut too big can’t be hidden by the fabric.
Installing ceiling paneling sheets
Sheets are rigid, so you cut them to size rather than stretching them around a curve. A full 4’x8′ sheet is awkward to maneuver inside a narrow rig, so work out the route in and where it will sit before you cut anything. Batten strips and seam tape cover the joints between sheets and give the ceiling a finished line. The supplier’s instructions for the specific sheet set the fasteners and sealant.

Headliner or paneling: which should you choose?
Start with the shape of the ceiling. A curved ceiling suits fabric headliner, which conforms to the arc, while rigid sheets don’t bend to it. A flat ceiling in a rig where a lot of cooking happens points toward sheets, because cloth absorbs odors and a smooth sheet wipes clean.
On cost, the table above gives a rough picture: a 4’x8′ sheet at about $29.99 against headliner at about $129.95 for an 8’6″ beige roll, before adhesive. Sheets look cheaper per piece, but add batten strips and seam tape for the joints and the gap narrows.
Mistakes that cost money or time

- Gluing over old foam. The new fabric is likely to fail early. Strip to the bare surface.
- Skipping ventilation. Adhesive vapors build up in a closed rig. Work with air moving and wear a respirator suited to the product.
- Cutting the fabric too small. Curved ceilings need extra width. Trim after the fabric is stuck down, not before.
- Covering a leak. New fabric over a wet substrate will fail again.
- Ordering without confirming the sheet. Some ceiling sheets are pickup only. Verify before building a plan around one.
Frequently asked questions
What material is used for RV ceilings?
Most are foam-backed knit headliner or rigid paneling. Padded headliner adds a layer about 3/8″ thick. Sheets, such as white ones around 3.4 mm thick with a smooth face, are the usual choice for flat ceilings and repairs. Behind either one sits bare metal, fiberglass or plywood.
Where can I buy RV ceiling paneling?
RV parts retailers, RV surplus suppliers and headliner specialty sellers all carry it. Headliner fabric is sold by the foot, in widths of about 8’6″ or just over 4 feet. Rigid sheets may be pickup only because of shipping cost, so confirm availability and current price before ordering.
How to replace ceiling panels in an RV?
For a fabric headliner, measure along the curve, strip all old fabric and foam, and clean the bare surface. Spray foam-compatible adhesive with air moving through the rig, press the oversized fabric on from the center outward, then trim the edges. For rigid sheets, cut to size and fasten per the product’s instructions. Fix any leak first.
What to put on a camper ceiling?
Either fabric headliner or a rigid sheet, depending on the ceiling. Curves call for headliner. A flat ceiling can take a sheet, which has a smooth face you can wipe down. Padded headliner is the option if you want a thicker layer of cushioning.